ArrayList、LinkedList源码解读

源码解读

List系列

LinkedList源码解读

结构认识

首先看LinkedList的类图

image-20210610153819284

实现了List接口和Deque双端队列接口,实现了所有可选的列表操作

其他抽象类与接口的解析:

  • AbstractSequentialList:继承AbstractList抽象类,AbstractList继承AbstractCollection

抽象类。表示是一个支持顺序访问的列表

  • Cloneable:支持克隆(浅克隆),底层实现:LinkedList节点并没有被克隆,只是通过Object的clone()方法得到的Object对象强制转化为了LinkedList,然后把它内部的实例域都置空,然后把被拷贝的LinkedList节点中的每一个值都拷贝到clone中。(后面有源码解析)
  • Serializable:支持序列化,底层只序列化节点的个数和节点的值;提供了readObject()和writeObject()

源码解析

首先看存储元素的数据结构

有一个静态私有内部类Node,存储结点值、前驱指针和后驱指针。从这里也可以看出来底层是双链表实现

1
2
3
4
5
6
7
8
9
10
11
private static class Node<E> {
E item;
Node<E> next;
Node<E> prev;

Node(Node<E> prev, E element, Node<E> next) {
this.item = element;
this.next = next;
this.prev = prev;
}
}

另外还有几个成员变量,分别是链表大小,头节点指针和尾结点指针,用transient修饰是为了保证不被序列化。

1
2
3
4
5
6
7
8
9
10
11
transient int size = 0;

/**
* Pointer to first node.
*/
transient Node<E> first;

/**
* Pointer to last node.
*/
transient Node<E> last;

LinkedList构造器有两个,一个无参构造和一个有参构造。

1
2
3
4
5
6
7
public LinkedList() {
}

public LinkedList(Collection<? extends E> c) {
this();
addAll(c);
}

注意有参构造参数为集合类,我们来看看addAll(c)方法。

1
2
3
4
5
6
7
8
9
10
11
12
13
14
15
16
17
18
19
20
21
22
23
24
25
26
27
28
29
30
31
32
33
34
35
36
37
38
39
40
41
42
43
44
45
46
47
48
49
50
51
52
53
  public boolean addAll(Collection<? extends E> c) {
return addAll(size, c); // 这里多传入了size,作为index,表示从当前链表末尾开始添加,
}

public boolean addAll(int index, Collection<? extends E> c) {
// 判断传入的索引是否合法
checkPositionIndex(index);

Object[] a = c.toArray();
int numNew = a.length;
if (numNew == 0)
// 如果集合为空,返回false
return false;
// pred:待添加结点的前一个结点
// succ:待添加结点的位置
Node<E> pred, succ;
// 如果要从末尾添加,那么succ应在尾结点之后,为null,pred为尾结点last;
if (index == size) {
succ = null;
pred = last;
} else {
// 非末尾添加,succ指向待插入位置的结点。node(index)返回index位置的结点,后面会解读。
succ = node(index);
pred = succ.prev;
}
// 初始化好succ与pred后,就要开始插入了。遍历集合toArray后的a
for (Object o : a) {
// 强制类型转为E
@SuppressWarnings("unchecked") E e = (E) o;
// 新建结点,前驱指向pred,即被插入位置结点的前驱。
Node<E> newNode = new Node<>(pred, e, null);
// 如果只有一个结点,置为首节点
if (pred == null)
first = newNode;
else
// 否则将该前驱结点的next置为新结点
pred.next = newNode;
// 前驱结点置为新结点,方便后续结点插入
pred = newNode;
}
// 遍历结束,此时怕pred指向的是最后一个元素,所以把last指向pred指向的结点。
if (succ == null) {
last = pred;
} else {
// 如果在中间插入,修改双链表的前后指针
pred.next = succ;
succ.prev = pred;
}

size += numNew;
modCount++;
return true;
}

addAll()有些复杂,主要是需要判断要插入的结点在末尾还是中间。同时需要注意观察首节点和尾结点是否变化,插入的时候由于是双链表,比单链表的步骤会多一些。

接下来看看一些普通操作

  • 头插法添加到首部
1
2
3
4
5
6
7
8
9
10
11
12
13
14
private void linkFirst(E e) {
final Node<E> f = first;
final Node<E> newNode = new Node<>(null, e, f);
// 将新结点置为first
first = newNode;
if (f == null)
// 如果原来首节点为空,说明链表为空,同时置为last
last = newNode;
else
// 否则将原来头节点的前驱结点置为新结点
f.prev = newNode;
size++;
modCount++;
}
  • 尾插法插入到尾部
1
2
3
4
5
6
7
8
9
10
11
12
13
14
void linkLast(E e) {
final Node<E> l = last;
final Node<E> newNode = new Node<>(l, e, null);
// 将last置为newnode
last = newNode;
// 如果last为null,说明链表为空,将first也置为newNode
if (l == null)
first = newNode;
// 否则将原来last的next置为newNode
else
l.next = newNode;
size++;
modCount++;
}
  • 在非空结点succ前插入
1
2
3
4
5
6
7
8
9
10
11
12
13
14
15
16
void linkBefore(E e, Node<E> succ) {
// assert succ != null;
// 保存待插入结点的前一个结点
final Node<E> pred = succ.prev;
final Node<E> newNode = new Node<>(pred, e, succ);
// 待插入结点的前一个结点置为newNode
succ.prev = newNode;
// 如果链表原来只有一个结点
if (pred == null)
// newNode成为头结点
first = newNode;
else
pred.next = newNode;
size++;
modCount++;
}
  • 删除链表中的第一个结点(结点不为空),并且范围被删除结点的值
1
2
3
4
5
6
7
8
9
10
11
12
13
14
15
16
17
private E unlinkFirst(Node<E> f) {
// assert f == first && f != null;
final E element = f.item;
final Node<E> next = f.next;
// 下面两步的null为解除头结点的引用,让GC进行回收
f.item = null;
f.next = null; // help GC
// 将头结点置为下一个
first = next;
if (next == null)
last = null;
else
next.prev = null;
size--;
modCount++;
return element;
}
  • 删除链表的最后一个结点,和unlinkFirst()思路差不多
1
2
3
4
5
6
7
8
9
10
11
12
13
14
15
16
17
private E unlinkLast(Node<E> l) {
// assert l == last && l != null;
final E element = l.item;
final Node<E> prev = l.prev;
// 将最后一个结点的引用解除
l.item = null;
l.prev = null; // help GC
// 最后一个结点为last前一个结点
last = prev;
if (prev == null)
first = null;
else
prev.next = null;
size--;
modCount++;
return element;
}
  • 删除链表中间一个结点,需要记录他的前驱和后继
1
2
3
4
5
6
7
8
9
10
11
12
13
14
15
16
17
18
19
20
21
22
23
24
25
26
27
28
E unlink(Node<E> x) {
// assert x != null;
final E element = x.item;
final Node<E> next = x.next;
final Node<E> prev = x.prev;

// 如果删除的是头结点
if (prev == null) {
first = next;
} else {
// prev(null)->x->next
prev.next = next;
x.prev = null;
}
// 如果删除的是尾结点
if (next == null) {
last = prev;
} else {
// prev->x->next(null)
next.prev = prev;
x.next = null;
}

x.item = null;
size--;
modCount++;
return element;
}
  • node(int index)根据索引返回对应索引的结点,做了一定的优化,先判断索引靠近头结点还是尾结点,然后选择不同的方向进行搜索
1
2
3
4
5
6
7
8
9
10
11
12
13
14
15
16
Node<E> node(int index) {
// assert isElementIndex(index);
// 如果索引靠近头结点,从头结点开始搜索
if (index < (size >> 1)) {
Node<E> x = first;
for (int i = 0; i < index; i++)
x = x.next;
return x;
} else {
// 索引靠近尾结点,从尾结点开始搜索
Node<E> x = last;
for (int i = size - 1; i > index; i--)
x = x.prev;
return x;
}
}

上面是私有的方法,我们不能用到,但是给我们提供的接口中很多都用到了这些方法,所以了解了上面的私有方法,对LinkedList的操作也有了大体的认识了。

总结一下,一共有6种私有方法:void linkFirst(E e)void linkLast(E e)linkBefore(E e, Node<E> succ)E unlinkFirst(Node<E> f)E unlinkLast(Node<E> l)E unlink(Node<E> x)

接下来看看常用操作的源码:

  • contains(),可以看到即遍历链表进行查询。
1
2
3
4
5
6
7
8
9
10
11
12
13
14
15
16
17
18
19
20
21
22
public boolean contains(Object o) {
return indexOf(o) >= 0;
}
public int indexOf(Object o) {
int index = 0;
// 如果结点值为null(结点存在!)
if (o == null) {
// 遍历链表查询
for (Node<E> x = first; x != null; x = x.next) {
if (x.item == null)
return index;
index++;
}
} else {
for (Node<E> x = first; x != null; x = x.next) {
if (o.equals(x.item))
return index;
index++;
}
}
return -1;
}
  • 删除某个结点
1
2
3
4
5
6
7
8
9
10
11
12
13
14
15
16
17
18
19
20
public boolean remove(Object o) {
if (o == null) {
// 如果被删除的结点值为null(非结点为null)
for (Node<E> x = first; x != null; x = x.next) {
if (x.item == null) {
// 遍历找到后调用unlink()删除该结点
unlink(x);
return true;
}
}
} else {
for (Node<E> x = first; x != null; x = x.next) {
if (o.equals(x.item)) {
unlink(x);
return true;
}
}
}
return false;
}
  • 清空链表
1
2
3
4
5
6
7
8
9
10
11
12
13
14
15
16
17
public void clear() {
// Clearing all of the links between nodes is "unnecessary", but:
// - helps a generational GC if the discarded nodes inhabit
// more than one generation
// - is sure to free memory even if there is a reachable Iterator
for (Node<E> x = first; x != null; ) {
Node<E> next = x.next;
// 逐个将结点的值置为null,引用解除
x.item = null;
x.next = null;
x.prev = null;
x = next;
}
first = last = null;
size = 0;
modCount++;
}
  • set
1
2
3
4
5
6
7
8
public E set(int index, E element) {
checkElementIndex(index);
Node<E> x = node(index);
E oldVal = x.item;
x.item = element;
// 返回旧值
return oldVal;
}
  • 添加
1
2
3
4
5
6
7
8
9
public void add(int index, E element) {
checkPositionIndex(index);
// 尾部插入
if (index == size)
linkLast(element);
else
// 在index结点前插入,element称为index处的结点
linkBefore(element, node(index));
}
  • 返回越界信息,辅助方法
1
2
3
private String outOfBoundsMsg(int index) {
return "Index: "+index+", Size: "+size;
}
  • 查找最后一个出现的元素的索引。即转化为从后往前遍历第一个出现的元素
1
2
3
4
5
6
7
8
9
10
11
12
13
14
15
16
17
public int lastIndexOf(Object o) {
int index = size;
if (o == null) {
for (Node<E> x = last; x != null; x = x.prev) {
index--;
if (x.item == null)
return index;
}
} else {
for (Node<E> x = last; x != null; x = x.prev) {
index--;
if (o.equals(x.item))
return index;
}
}
return -1;
}

接下来是双端队列有关的操作,都比较简单,就不详细分析了。

1
2
3
4
5
6
7
8
9
10
11
12
13
14
15
16
17
18
19
20
21
22
23
24
25
26
27
28
29
30
31
32
33
34
35
36
37
38
39
40
41
42
43
44
45
46
47
48
49
50
public E peek() {
final Node<E> f = first;
return (f == null) ? null : f.item;
}
public E element() {
return getFirst();
}
public E poll() {
final Node<E> f = first;
return (f == null) ? null : unlinkFirst(f); // 去掉头结点
}
public E remove() {
return removeFirst();
}

public boolean offer(E e) {
return add(e); // 链表尾部添加
}
public boolean offerFirst(E e) {
addFirst(e); // 链表头部添加
return true;
}
public boolean offerLast(E e) {
addLast(e); // 链表尾部添加
return true;
}

// 移除第一次出现的元素,从前往后遍历
public boolean removeFirstOccurrence(Object o) {
return remove(o);
}
// 移除最后一次出现的元素,从后往前遍历
public boolean removeLastOccurrence(Object o) {
if (o == null) {
for (Node<E> x = last; x != null; x = x.prev) {
if (x.item == null) {
unlink(x);
return true;
}
}
} else {
for (Node<E> x = last; x != null; x = x.prev) {
if (o.equals(x.item)) {
unlink(x);
return true;
}
}
}
return false;
}

接下来是克隆的辅助方法

1
2
3
4
5
6
7
8
9
10
11
12
13
14
15
16
17
18
19
20
21
22
23
24
25
private LinkedList<E> superClone() {
try {
// 直接调用超类的clone()
return (LinkedList<E>) super.clone();
} catch (CloneNotSupportedException e) {
throw new InternalError(e);
}
}

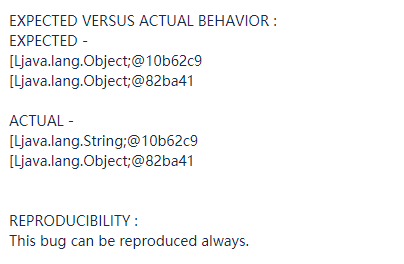
//首先获取从辅助方法返回的LinkedList对象,接着把该对象的所有域都设置为初始值。
//然后把LinkedList中所有的内容复制到返回的对象中。
public Object clone() {
LinkedList<E> clone = superClone();

// Put clone into "virgin" state
clone.first = clone.last = null;
clone.size = 0;
clone.modCount = 0;

// Initialize clone with our elements
for (Node<E> x = first; x != null; x = x.next)
clone.add(x.item);

return clone;
}

然后是转为数组

1
2
3
4
5
6
7
8
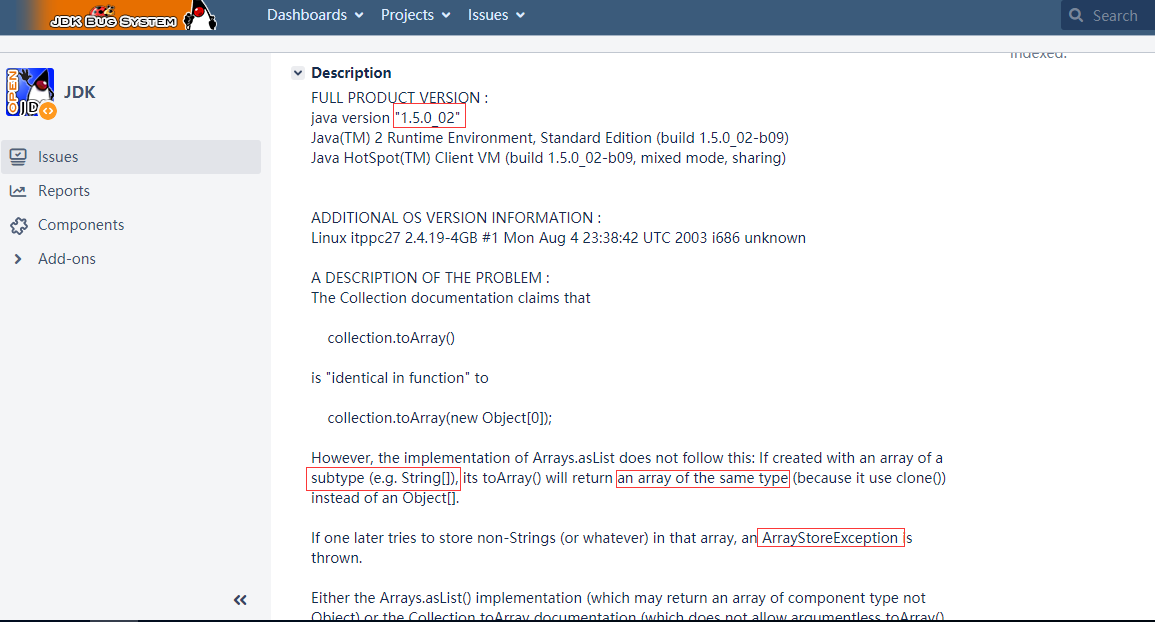
public Object[] toArray() {
// Object[],因此可能效率会有些慢
Object[] result = new Object[size];
int i = 0;
for (Node<E> x = first; x != null; x = x.next)
result[i++] = x.item;
return result;
}

还有一个重载方法,参数是数组。利用反射创建一个大小相同的数组,ArrayList中也有同样的考虑和设计。

1
2
3
4
5
6
7
8
9
10
11
12
13
14
15
16
17

public <T> T[] toArray(T[] a) {
if (a.length < size)
// 如果数组大小小于链表长度。利用反射创建一个大小相同的数组
a = (T[])java.lang.reflect.Array.newInstance(
a.getClass().getComponentType(), size);
int i = 0;
Object[] result = a;
for (Node<E> x = first; x != null; x = x.next)
// 然后把链表结点的值依次赋值给数组
result[i++] = x.item;
// 如果数组大小大于链表长度,将多余的部分置为null
if (a.length > size)
a[size] = null;

return a;
}

然后是序列化的方法

1
2
3
4
5
6
7
8
9
10
11
12
13
14
15
16
17
18
19
20
21
22
23
24
25
26
27
28
29
30
31
32
33
34
35
36
37
38
39
40
41
42
43
44
45
46
47
48
49
50
51
52
53
54
55
56
57
58
59
60
61
62
63
64
65
66
67
68
69
70
71
72
73
74
75
76
77
78
79
80
81
82
83
84
85
86
87
88
private void writeObject(java.io.ObjectOutputStream s)
throws java.io.IOException {
// Write out any hidden serialization magic
s.defaultWriteObject();

// Write out size
s.writeInt(size);

// Write out all elements in the proper order.
for (Node<E> x = first; x != null; x = x.next)
s.writeObject(x.item);
}

/**
* Reconstitutes this {@code LinkedList} instance from a stream
* (that is, deserializes it).
*/
@SuppressWarnings("unchecked")
private void readObject(java.io.ObjectInputStream s)
throws java.io.IOException, ClassNotFoundException {
// Read in any hidden serialization magic
s.defaultReadObject();

// Read in size
int size = s.readInt();

// Read in all elements in the proper order.
for (int i = 0; i < size; i++)
linkLast((E)s.readObject());
} private void writeObject(java.io.ObjectOutputStream s)
throws java.io.IOException {
// Write out any hidden serialization magic
s.defaultWriteObject();

// Write out size
s.writeInt(size);

// Write out all elements in the proper order.
for (Node<E> x = first; x != null; x = x.next)
s.writeObject(x.item);
}

/**
* Reconstitutes this {@code LinkedList} instance from a stream
* (that is, deserializes it).
*/
@SuppressWarnings("unchecked")
private void readObject(java.io.ObjectInputStream s)
throws java.io.IOException, ClassNotFoundException {
// Read in any hidden serialization magic
s.defaultReadObject();

// Read in size
int size = s.readInt();

// Read in all elements in the proper order.
for (int i = 0; i < size; i++)
linkLast((E)s.readObject());
}

然后里面还提供了两个静态内部迭代器,一种是返回Iterator,另一种返回ListIterator,迭代器的代码就不细说了

至此LinkedList的源码解析就差不多了。

ArrayList源码解读

结构认识

image-20210611203046809

ArrayList继承了AbstractList抽象类,主要实现了ListRandomAccessSerializable接口

  • RandomAccess:表示支持随机访问
  • Cloneable:表示支持克隆
  • Serializable:表示支持序列化反序列化

源码解析

我们可以看到ArrayList存在两个有参构造和一个无参构造,我们来看看

构造方法

在解读之前,需要了解几个参数:

1
2
3
4
5
6
7
8
9
10
11
12
13
14
// 默认容量大小为10个元素
private static final int DEFAULT_CAPACITY = 10;
// 该ArrayList容量为0时,返回该空数组。
private static final Object[] EMPTY_ELEMENTDATA = {};
// 它与EMPTY_ELEMENTDATA的区别就是:该数组是默认返回的,而EMPTY_ELEMENTDATA是在用户指定容量为0时返回。
private static final Object[] DEFAULTCAPACITY_EMPTY_ELEMENTDATA = {};
// !底层的数组实现!第一次添加元素的时候就会扩容到DEFAULT_CAPACITY=10.
// 标记为transient表示不会被序列化
transient Object[] elementData; // non-private to simplify nested class access

// 实际的元素大小,非数组的容量。
private int size;
// ArrayList最大容量:
private static final int MAX_ARRAY_SIZE = Integer.MAX_VALUE - 8;

这里有个疑问,为什么最大数组容量是Integer.MAX_VALUE - 8呢?字段上面的注释为:

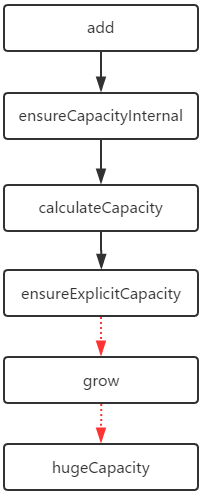
The maximum size of array to allocate (unless necessary). Some VMs reserve some header words in an array. Attempts to allocate larger arrays may result in OutOfMemoryError: Requested array size exceeds VM limit,翻译过来的重点就是虚拟机还需要存储头部字段,头部字段刚好占8个字节,所以如果要分配Integer.MAX_VALUE个容量的话就会导致OOM。

然后看构造函数

1
2
3
4
5
6
7
8
9
10
11
12
13
14
15
16
17
18
19
20
21
22
23
24
25
26
27
28
29
30
31
public ArrayList(int initialCapacity) {
if (initialCapacity > 0) {
// 如果指定容量,创建指定容量的数组
this.elementData = new Object[initialCapacity];
} else if (initialCapacity == 0) {
// 如果为0返回空数组
this.elementData = EMPTY_ELEMENTDATA;
} else {
throw new IllegalArgumentException("Illegal Capacity: "+
initialCapacity);
}
}

public ArrayList() {
this.elementData = DEFAULTCAPACITY_EMPTY_ELEMENTDATA;
}

public ArrayList(Collection<? extends E> c) {
// 如果是传入集合,转为数组赋值给elmentData
elementData = c.toArray();
// 集合c不为空的时候
if ((size = elementData.length) != 0) {
// defend against c.toArray (incorrectly) not returning Object[]
// (see e.g. https://bugs.openjdk.java.net/browse/JDK-6260652)
if (elementData.getClass() != Object[].class)
elementData = Arrays.copyOf(elementData, size, Object[].class);
} else {
// replace with empty array.
this.elementData = EMPTY_ELEMENTDATA;
}
}

有一句代码我看到产生了疑惑,注意到为什么要判断if (elementData.getClass() != Object[].class)呢?因为elmentData已经是Object[]了呀。查看源码的注释,是为了防止出现异常情况导致转换的数组类型非Object。我们去这个网址看看。

image-20210611205401528

原来在jdk1.5的时候发现了一个bug,如果使用Arrays.asList()将String类型的数组转为静态列表作为参数传入,这个生产的静态列表toArray后会是一个String[]而非Object[],这样就会导致后面如果插入非String类型的数据时会出现插入异常。

官网也附带了出现问题的代码:

1
2
3
4
5
6
7
8
9
10
public class ToArray
{
public static void main(String[] args)
{
List l = Arrays.asList(args);

System.out.println(l.toArray());
System.out.println(l.toArray(new Object[0]));
}
}
image-20210611210018321

官网说期待的结果应该是出现两个Object[],但是实际上出现了String[].

本机jdk为12,使用本机运行测试,结果如下:

本机结果

猜测可能在某个版本被修复了,所以bug也不存在了。

这不是重点,我们继续来看源码。

接下来调用elementData = Arrays.copyOf(elementData, size, Object[].class);进行数组的复制。

这里是使用了深拷贝,表示将elementData指向的数组重新拷贝一份转为Object对象赋值给elementData

下面看看主要的私有方法:

  • 优化数组内存,即将ArrayList的容量设置为实际elementData数组的大小。
1
2
3
4
5
6
7
8
9
// Trims the capacity of this ArrayList instance to be the list's current size.
public void trimToSize() {
modCount++;
if (size < elementData.length) {
elementData = (size == 0)
? EMPTY_ELEMENTDATA
: Arrays.copyOf(elementData, size);
}
}
  • 保证ArrayList的容量至少在指定的最小容量之上。数组容量检查,不够时则进行扩容,只供类内部使用*
1
2
3
4
5
6
7
8
9
// increases the capacity of this ArrayList instance, if necessary, to ensure that it can hold at least the number of elements specified by the minimum capacity argument.
public void ensureCapacity(int minCapacity) {
if (minCapacity > elementData.length
&& !(elementData == DEFAULTCAPACITY_EMPTY_ELEMENTDATA
&& minCapacity <= DEFAULT_CAPACITY)) {
modCount++;
grow(minCapacity);
}
}
  • 数组扩容方法*(重点),有两个重载方法,如果不传参数默认把size+1.如果传入参数,那么扩容到计算后的容量。其中计算方法是newCapacity(minCapacity)).
1
2
3
4
5
6
7
8
private Object[] grow(int minCapacity) {
return elementData = Arrays.copyOf(elementData,
newCapacity(minCapacity));
}

private Object[] grow() {
return grow(size + 1);
}

我们看看新容量的计算方法,可以看到扩容后新容量是原来的1.5倍

1
2
3
4
5
6
7
8
9
10
11
12
13
14
15
16
17
18
19
20
21
22
23
24
25
26
27
private int newCapacity(int minCapacity) {
// overflow-conscious code
int oldCapacity = elementData.length;
// 新容量是原来的1.5倍
int newCapacity = oldCapacity + (oldCapacity >> 1);
// 如果新容量比旧容量算出来还小或者相等
if (newCapacity - minCapacity <= 0) {
// elementData就空数组的时候,length=0,那么oldCapacity=0,newCapacity=0,那么就是第一次初始化elementData的大小了,就是为10.
if (elementData == DEFAULTCAPACITY_EMPTY_ELEMENTDATA)
return Math.max(DEFAULT_CAPACITY, minCapacity);
if (minCapacity < 0) // overflow
throw new OutOfMemoryError();
return minCapacity;
}
// 如果容量大小超出限制,扩容到最大容量
return (newCapacity - MAX_ARRAY_SIZE <= 0)
? newCapacity
: hugeCapacity(minCapacity);
}

private static int hugeCapacity(int minCapacity) {
if (minCapacity < 0) // overflow
throw new OutOfMemoryError();
return (minCapacity > MAX_ARRAY_SIZE)
? Integer.MAX_VALUE
: MAX_ARRAY_SIZE;
}
  • 添加操作
1
2
3
4
5
6
private void add(E e, Object[] elementData, int s) {
if (s == elementData.length)
elementData = grow();
elementData[s] = e;
size = s + 1;
}

下图展示了ArrayList.add()的调用过程。(图源网络)

add调用过程可能执行的方法
  • 删除方法
1
2
3
4
5
6
7
8
9
10
11
12
13
14
15
16
17
18
19
public E remove(int index) {
Objects.checkIndex(index, size);
final Object[] es = elementData;

@SuppressWarnings("unchecked") E oldValue = (E) es[index];
fastRemove(es, index);

return oldValue;
}

private void fastRemove(Object[] es, int i) {
modCount++;
final int newSize;
if ((newSize = size - 1) > i)
// 这句表示将删除元素位置后面的元素前移一位,大小-1
System.arraycopy(es, i + 1, es, i, newSize - i);
// 将大小-1,并且置为null,这样才会主动触发GC
es[size = newSize] = null;
}

步骤可以概况如下:

  1. 进行越界检查
  2. 记录修改次数(modCount 可以用来检测快速失败的一种标志。)
  3. 通过索引找到要删除的元素
  4. 移动元素(其实是覆盖掉要删除的元素)
  5. 将–size上的位置赋值为null,让gc(垃圾回收机制)更快的回收它。
  6. 返回被删除的元素
  • 清空
1
2
3
4
5
6
7
public void clear() {
modCount++;
final Object[] es = elementData;
for (int to = size, i = size = 0; i < to; i++)
// 将每个元素置为null
es[i] = null;
}
  • addAll(),批量添加集合
1
2
3
4
5
6
7
8
9
10
11
12
13
14
15
16
17
public boolean addAll(Collection<? extends E> c) {
Object[] a = c.toArray();
modCount++;
int numNew = a.length;
// 如果c为空,返回false
if (numNew == 0)
return false;
Object[] elementData;
final int s;
// 如果添加的集合大小大于 ArrayList容量-大小(即剩余空间位置)
if (numNew > (elementData = this.elementData).length - (s = size))
// 就扩容到当前元素大小+要添加的集合大小
elementData = grow(s + numNew);
System.arraycopy(a, 0, elementData, s, numNew);
size = s + numNew;
return true;
}
  • addAll(),在指定位置批量添加
1
2
3
4
5
6
7
8
9
10
11
12
13
14
15
16
17
18
19
20
21
22
23
24
25
public boolean addAll(int index, Collection<? extends E> c) {
rangeCheckForAdd(index);

Object[] a = c.toArray();
modCount++;
int numNew = a.length;
if (numNew == 0)
return false;
Object[] elementData;
final int s;
// 如果剩余空间不够就扩容
if (numNew > (elementData = this.elementData).length - (s = size))
elementData = grow(s + numNew);
// 计算要移动的元素的个数(后移)
int numMoved = s - index;
if (numMoved > 0)
// 如果需要后移,那么先在原数组后移,将原数组index后的numMoved个元素移到index + numNew开始,中间间隔了numNew开始
System.arraycopy(elementData, index,
elementData, index + numNew,
numMoved);
// 然后将中间间隔的numNew个空间赋值
System.arraycopy(a, 0, elementData, index, numNew);
size = s + numNew;
return true;
}

概况来说步骤如下:

  1. 判断要添加的索引是否合法
  2. 判断剩余空间是否足够添加全部,不够就扩容
  3. 将原数组index位置后面的元素后移numNew(要添加集合元素的大小)位
  4. 从index处开始依次将待添加集合的元素赋值进数组的中间间隔处
  • 批量删除
1
2
3
4
5
6
7
8
9
10
11
12
13
14
15
protected void removeRange(int fromIndex, int toIndex) {
if (fromIndex > toIndex) {
throw new IndexOutOfBoundsException(
outOfBoundsMsg(fromIndex, toIndex));
}
modCount++;
shiftTailOverGap(elementData, fromIndex, toIndex);
}
private void shiftTailOverGap(Object[] es, int lo, int hi) {
// 将原数组从左边高位索引hi后的元素覆盖到低位索引lo处
System.arraycopy(es, hi, es, lo, size - hi);
for (int to = size, i = (size -= hi - lo); i < to; i++)
// 将多余的元素主动释放,提醒GC
es[i] = null;
}
  • 删除全部。发现removeAll()retainAll()调用的是同一个方法,只是参数不一样。重点分析batchRemove()

retainAll():仅保留调用者 collection (c1)中那些也包含在指定 collection(参数,c2) 的元素(可选操作)。换句话说,移除此 collection 中未包含在指定 collection 中的所有元素。实际上该方法是指:如果集合c1中的元素都在集合c2中则c1中的元素不做移除操作,反之如果只要有一个不在list2中则会进行移除操作。

例如:c1:{1,2,3,4}, c2:{1,2,3,4,5},那么c1.retainAll(c2),返回为false,因为c1是c2子集,不会进行删除操作。

c1:{1,2,3,6}, c2:{1,2,3,4,5},那么c1.retainAll(c2),返回为true,因为6不属于c2,那么c1删除6,结果为c1:{1,2,3}

1
2
3
4
5
6
7
8
9
10
11
12
13
14
15
16
17
18
19
20
21
22
23
24
25
26
27
28
29
30
31
32
33
34
35
36
37
38
39
40
41
42
43
44
45
46
47
48
49
50
public boolean removeAll(Collection<?> c) {
return batchRemove(c, false, 0, size);
}

public boolean retainAll(Collection<?> c) {
return batchRemove(c, true, 0, size);
}

boolean batchRemove(Collection<?> c, boolean complement,
final int from, final int end) {
Objects.requireNonNull(c);
final Object[] es = elementData;
int r;
// Optimize for initial run of survivors
for (r = from;; r++) {
if (r == end)
return false;
// 判断集合c中是否包含原集合中的当前元素
if (c.contains(es[r]) != complement)
//retainAll:如果不包含则跳出循环 removeAll:如果包含则跳出循环
break;
}
// w记录要删除的索引,因为for循环跳出时r就是原数组中要删除的索引
int w = r++;
try {
// 从要删除的下一个元素遍历
for (Object e; r < end; r++)
// retainAll:如果包含元素,那么将该元素覆盖,注意此时还未调整数组,所以这个for循环后只是把要删除的元素重新覆盖了。
if (c.contains(e = es[r]) == complement)
es[w++] = e;
} catch (Throwable ex) {
// Preserve behavioral compatibility with AbstractCollection,
// even if c.contains() throws.
System.arraycopy(es, r, es, w, end - r);
w += end - r;
throw ex;
} finally {
modCount += end - w;
// 走到这里才会真正地去修改数组,返回最后被删除元素后的ArrayList
shiftTailOverGap(es, w, end);
}
return true;
}

private void shiftTailOverGap(Object[] es, int lo, int hi) {
// 删除lo-hi之间的元素
System.arraycopy(es, hi, es, lo, size - hi);
for (int to = size, i = (size -= hi - lo); i < to; i++)
es[i] = null;
}

这个方法比较复杂,因为complement指代了两种相反的操作,默认c1为调用者集合对象,,c2为传入的参数,具体的解释如下:

  • 如果complement = false,即c1.removeAll(c2),那么会从c1中删除所有c2中存在的元素
  • 如果complement = true,即c1.retainAll(c2),那么会从c1中删除所有在c2中不存在的元素

我们继续

  • 序列化、反序列化的方法
1
2
3
4
5
6
7
8
9
10
11
12
13
14
15
16
17
18
19
20
21
22
23
24
25
26
27
28
29
30
31
32
33
34
35
36
37
38
39
40
41
42
43
44
45
46
private void writeObject(java.io.ObjectOutputStream s)
throws java.io.IOException {
// Write out element count, and any hidden stuff
int expectedModCount = modCount;
s.defaultWriteObject();

// Write out size as capacity for behavioral compatibility with clone()
s.writeInt(size);

// Write out all elements in the proper order.
for (int i=0; i<size; i++) {
s.writeObject(elementData[i]);
}

if (modCount != expectedModCount) {
throw new ConcurrentModificationException();
}
}


private void readObject(java.io.ObjectInputStream s)
throws java.io.IOException, ClassNotFoundException {

// Read in size, and any hidden stuff
s.defaultReadObject();

// Read in capacity
s.readInt(); // ignored

if (size > 0) {
// like clone(), allocate array based upon size not capacity
SharedSecrets.getJavaObjectInputStreamAccess().checkArray(s, Object[].class, size);
Object[] elements = new Object[size];

// Read in all elements in the proper order.
for (int i = 0; i < size; i++) {
elements[i] = s.readObject();
}

elementData = elements;
} else if (size == 0) {
elementData = EMPTY_ELEMENTDATA;
} else {
throw new java.io.InvalidObjectException("Invalid size: " + size);
}
}
  • 迭代器

ArrayList也提供了IteratorListIterator两种迭代器

具体区别补充一下:

  • Iterator是所有Collection类(List、Set....)们都可以使用的迭代器,而ListIterator则是专门为List类所设计的迭代器

  • Iterator只支持hasNext()next()remove()三种操作,而ListIterator除了原本的3种之外,还支持了更多操作

1
2
3
4
5
6
7
8
9
10
11
12
13
14
//ListIterator接口
public interface ListIterator<E> extends Iterator<E> {
//继承自Iterator的接口
boolean hasNext(); //后面是否有元素
E next(); //游标向后移动,取得后面的元素
void remove(); //删除最后一个返回的元素
//ListIterator新增的接口
boolean hasPrevious(); //前面是否有元素
E previous(); //游标往前移动,取得前面的元素
int previousIndex(); //取得游标前的index
int nextIndex(); //取得游标后的index
void set(E e); //将当前元素改设成e
void add(E e); //增加一个元素java

  • Iterator只能remove()元素,而ListIterator可以add()set()remove()
  • Iterator只能使用next()顺序的向后遍历,ListIterator则向前previous()和向后next()遍历都可以
  • 如果想在遍历List时边做删除,用Iterator和ListIterator都能办到,但如果是想在遍历List时add元素,则只能使用ListIterator去做,因为Iterator是不提供此接口的
  • 虽然ArrayList和LinkedList都支持ListIterator,但通常只有在使用LinkedList时才会搭配ListIterator
  • 因此可以说ListIterator根本是为LinkedList发明的,ArrayList只是顺道实现而已,ArrayList去实现只是为了设计成让List接口的类们都能使用ListIterator而已

ArrayList的主要部分源码也差不多解读完了。

总结:

  • arrayList可以存放null。
  • arrayList本质上就是一个elementData数组。
  • arrayList区别于数组的地方在于能够自动扩展大小,其中关键的方法就是gorw()方法。
  • arrayList中removeAll(collection c)clear()的区别就是removeAll可以删除批量指定的元素,而clear是全是删除集合中的元素。
  • arrayList由于本质是数组,所以它在数据的查询方面会很快,而在插入删除这些方面,性能下降很多,有移动很多数据才能达到应有的效果。
  • arrayList实现了RandomAccess,所以在遍历它的时候推荐使用for循环。

本博客所有文章除特别声明外,均采用 CC BY-SA 4.0 协议 ,转载请注明出处!